Powered By Blogger

30 October 2019

It's spring time and there are flowers everywhere!


After a very dry and dusty winter in Johannesburg, seeing flowers blooming everywhere is a welcome sight. There has been some rain, just enough to get excited about and dream of Spring time and Summer rain that are very much needed.

A little bit on the history to the trees. The Jacaranda "mimosifolia" is not a native African tree, but originated in South America. It is believe that the trees first arrived in Gauteng in 1888, during the Gold Rush and quickly became so popular that the trees were planted in every street during a time when the cities Johannesburg and Pretoria were growing very fast.

The fragrant purple blossoms are seen every year during the October and early November months, especially in Johannesburg and Pretoria's older suburbs.

The photos' below were taken in one of Johannesburg oldest suburbs, Kensington.

Kensington street, Jacaranda trees
Hello! That's me and my little girl posing for the camera

The ground is covered in fallen blossoms
More about Jacaranda trees and their history in South Africa, can be found here:

14 August 2019

Update on the 2 blouses

The first is a short sleeve blouse (Burdastyle 10.2015) with pleats around the neck, in stunning spring colors.

Close up images below of the pleats around the neck, facings and the short raglan sleeves. I decided on rounding the bottom edge seams and then ended up leaving a little opening higher up on the side seam.


Woohoo, the blouse looks great and the raglan style fits amazing too. The pleats around the neck gives plenty of space for the bust and chest area and very flattering also. 
Another stunning addition to my work wardrobe and will go with any of my black, blue and white pants!


The 2nd blouse (from Burdastyle 6.2019) has long sleeves with a bunch of pleats and a wide eye-catching placket at the front of the blouse.

So here are close-ups of the slit openings at the cuffs, below.

It took me a little longer than I thought it would, only 'cause it requires a little test run and then lots of patience and slow going on the machine.


Here are the 2 sleeves side by side, ready to insert into the arm holes.

Next, I will attach the cuff bands and button holes with buttons, attach the sleeves to the bodice and finally the finishing of the remaining part of the neckline.


And another look at the placket, this time completed, on the inside and the outside. I didn't tuck in the seams as some of the tutorials suggested. The overlocking stitches on the edges won't peek out or be visible to anyone but me, and I'm totally fine with that.


I can't wait to wear my new blouses in the coming months. Spring is just around the corner and the long sleeve blouse is cool enough in the cotton/viscose fabric that I will get a lot of wear out of it and it's perfect addition to my work outfits!

06 August 2019

My current projects - 2 blouses

So, I got a bit cutting happy and drafted 2 blouse patterns. Well, ideally you have to use up previously bought fabric before buying anything new right? And since there was a sale at my favorite fabric store, and I couldn't leave without getting at least 4 new pieces of fabric... well, that's where I got where I am, busy constructing 2 blouses simultaneously.

The first is a short sleeve blouse (Burdastyle 10.2015) with pleats around the neck. It had to be a spring/summer blouse because of the cool colors in the fabric. 
Burdastyle 10.2015

Front and Back folded, sleeves and facings
So far, I've sewn the pleats on the front top piece and attached the front to the back at the side seams.  
Next I will be hauling out the overlocker to tidy up and cover stitch the seams. After which comes the sleeves and then the neck facings, ironing on stiffening before attaching to the top. There is a small opening on the back neck, and that is easily incorporated with the neck facing pieces. Wow, this blouse is going pretty fast! 

I decided not to insert the funny flappy thingies on the sides of the blouse. I don't know what that is all about, but I cut the bottom of the blouse slightly wider and will do a standard fold-over seam.

The 2nd blouse (from Burdastyle 6.2019) has prominent long sleeves that has a zillion pleats to be sewn at the cuffs and a wide eye-catching placket at the front of the blouse. 
Burdastyle Blouse 06.2019

I noticed that there aren't any bust darts, so I hope the width of the blouse and the neck opening allows for enough movement.
Here are images of the work in progress on the sleeves. So far, I've transferred the markings for the pleats on to the fabric pieces and then pinned each pleat in preparation for stitching.

       
Sleeve Pattern with cuff darts
Next up is the neck opening with the placket pieces pinned and ready to be sewn. This is officially my first attempt at doing a placket so I had to do a bit of research for the steps. Luckily there are many how-to's to be found, so I think I've got the idea... 
Neck opening with placket, in progress
Anyway, up-wards and on-wards. I will update with more as I go along but I think these babies should be done by the weekend ( I hope). 

08 July 2019

Catching up on my latest quilt projects

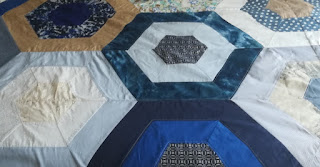
So, as update on a the earlier post about my latest beachy quilt, I now can show you the final pictures. The quilt finally got done - I finished the edges with a wide light blue bias strip around the edges and rounded corners and used a binding sewing foot to keep all the layers of fabric and laying flat while stitching.

Perhaps it's not the right colors for the cold winter months we are experiencing in Johannesburg right now, but I absolutely love the blue and beige colors as it reminds me of the beautiful blue sky on a typical winter's day and of the different blue colors of the ocean. The colors and the style is so soothing.. I think I'm totally sold on the hexagon shape and could definitely make another hexagon quilt in the future. Mmmm, maybe it's time to check my scrappy stash again..... 


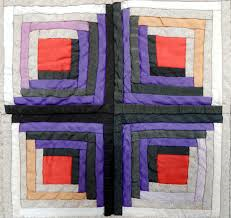
So now the next scrappy quilt project I'm planning is for my daughter in various left-over blue and pink fabrics. I just love the idea of little Russian dolls (in various sizes) in the centre of each block and I am about half way with the final number of blocks, so here is a little pic to give you an idea of the overall look. 

And in order to create the pattern with the pink and blue fabric strips, the colors are strategically placed. The right and bottom strips are shades of blue and the left and top fabrics strips are in different shades of pink. 

After these are done, I will add another layer of pink and blue strips around to get to the final block size. 
Below is an example of 4 log cabin blocks, that placed together, make this visual pattern. 


29 April 2019

Formal wrap dress with knit fabric


With a last minute scramble, I have to find a suitable outfit for a wedding that is less than a week away. My preference is to make it of course, also because all the stunning dresses I've seen in stores are in different shades of brown. Igg. Unfortunately the browns and yellows in the winter colors don't work with my complexion very well.

I've decided on a lengthy wrap dress, in a woven knit fabric and went to a local fabric store in search of something suitable and found a stunning knit fabric (below), that I think will do the trick.

There are tiny gold flecks in the fabric and the colors are perfect! And I can pair the dress with a formal dark green coat on the night.


So, now for the dress pattern. I would like to do a longer wrap dress this time, with raglan sleeves and couldn't find such a pattern so I had to settle on a course of 'franken-pattern'.
Wrap Dress Burda 10/2011

Wrap dress Burda 4/2015

First, I traced the top pieces from the April 2015- model and then the skirt pieces of the Oct 2011-model, both in size 40. No need even to draft a new pattern, just cut out the pieces and sew together. I did do a quick check to make sure the skirt and top pieces match up at the waist widths.

Then on to the construction of the dress. I normally like to start with the overlocker to neaten all the edges. Next step is stitching of darts


At this point, the bust darts are completed on the front and back pieces, following with the shoulder seams. The facings are then stitched together at the should seams and attached to the neck line of the dress.


Here are the 2 sleeves lay out flat. By merging the 2 pattern pieces together I only had to stitch the curved shoulder dart.


And here is the dress, completed and pressed, hanging on the dress-form. It fits perfectly over the bust and neck and the waist closure is also very comfortable.


The dress is a bit long as I added a few cm's to the bottom seam and now the skirts ends up feeling heavy, so I might decide to shorted a bit at a later stage, but for now I like the longer length and will keep it this way.


And here is a photo of me wearing the dress to a party this past weekend. Actually, now that I've worn it again and had a good look at it in the daytime, I think I'm ok with the length as it is!
So, now I can work on some of my unfinished projects that are waiting for my attention... I did manage to make a few Barbie outfits this weekend. Those quick, spur of the moment projects are always the best!

11 April 2019

Wrap dress sporting flutter sleeves in bubble chiffon


This weekend I was very busy with the construction of a dress for a client. She needed a new outfit for a friend's wedding that is coming up soon.

So let's start with the design - a wrap dress with diagonal darts in the bodice, waist ties and flutter sleeves. My client just loved the darts in this design, as it creates a very flattering drape across the bust area. 
The fabric is a soft woven print, called bubble chiffon but I've seen it named bubble crepe as well, depending on the weight and of the fabric. It is so pretty and lovely to handle. The bubble in the fabric allows for a slight 2-way stretch, and makes it easy to work with and also to wear. I will definitely consider it for a future project if I come across it again!

The picture below was taken after the neckline facings and shoulder seams were done, because I wanted to see how the pleats look like on the model.


Then I added the self-drawn flutter sleeves and for anyone still wondering, I've included a quick draft and picture thereof below on how to draw a new pattern for a flutter sleeve on the fly.

Start off with the original sleeve pattern, and cut vertical lines from the hem to almost at the sleeve cap. Then spread the pieces apart to make the pattern wider and fuller at the bottom.

You can adjust and spread the pieces to add as much flare as you want.
The final shape of the pattern will look a little funny, that's perfectly fine. So now you have more fullness at the bottom, but no gathering or poofiness at the cap of the sleeve.

The sleeve were an elegant solution and suits the dress in this case perfectly, adding to the summer feel of the dress. 

She promised me a final photo with her wearing the dress and I will post once I get it.

Quick update of the post:

And here she is!! The dress is a perfect fit and she looks very happy with it. Here she is posing for a little picture, before going in to her friend's wedding. 


09 April 2019

End of summer open gardens


I spotted the advert for one of my favorite open gardens, that was hosting another event and market on the weekend past.

So, a friend and I organised ourselves away from family and responsibilities for a bit and enjoyed a guilt free morning wandering in the beautiful gardens.

The first stop was at Beechwood Garden. It is a classical landscaped garden, laid out in 1945 by the landscape architect Joane Pim and redesigned by current owners. The 3.5 acre garden surrounds the beautiful residence home and features a very old Water Oak tree. 

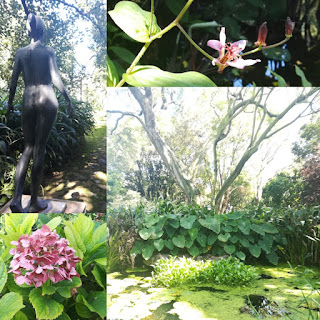
The garden opens up to a forest and then several winding paths lead to an area with several ponds. I spotted a flourishing orchid with tiny speckled flowers around one of the ponds.

Sitting in the formal rose garden
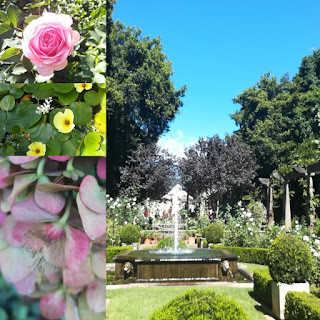
I took a few pictures of the formal rose garden and around the rose-covered colonnade.

Open Garden - Beechwood
There is also a vegetable garden with wide varieties of vegetables and herbs growing around another water fountain with water lilies.
Open Garden - Beechwood.
What a treat to have favorite food and drink vendors to cater for all tastes. I opted for a crepe with sugar and cinnamon and my friend chose a slice of chocolate cheese cake and off we went to explore.

These are a few of my favorite photo's from the morning's wanderings. More information on the garden and it's heritage, just click on the link here.
Open Garden - Beechwood
We still had enough time to catch another open garden in the area and I took some photo's there as well - see below. 
The little bunnies in between the daffodil bundles were the cutest! There was also a little house with little concrete mushrooms that added to the whole whimsical theme.
Open Garden 2 - In the area

28 March 2019

Weekend away - Inspiration photo


I've been away the last weekend, and these are some random photo's from the trip, taken with my phone.

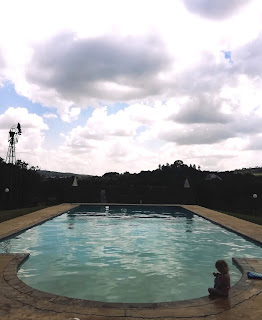
View of the pool
What a stunning pool and view. Perfect spot for sunbathing, swimming and unwinding!

Cotton curtains with hand applique

Isn't this just beautiful? It's fine cotton with the images appliqued (by hand) onto the fabric. With the light shining through it from outside, it made such a striking sight! I asked and was told a find from India.

And old bed spring that is hung up on a feature wall. Is that like a thing now? Like repurposing and refashion of old and unused "stuff". I do think it added a little something interesting to the whole layout, but not something I would like in my home though....

Slinky Blue Wrap top


Here is one of the latest projects I finished and it's my version of the Wrap Blouse of Burdastyle 3/2018 edition, pattern #115.
Wrap Blouse 3/2019
Yes, I know it's another wrap something. I just love wrap tops and dresses, what can I say. They are flattering and adjustable, so I can move the closures a little in or out as needed.

It's a beautifully blue floral print fabric and has a nice soft drape to it and a satiny finish. I think the band on the sleeve should be slightly tighter to give the sleeve it's poufy shape, but will leave it for now.


Above as seen on my new dress form. The dress form is the newest addition to my sewing buys. And this is the first project that I've fitted on it.


I've worn it a few times this summer, but here I actually have a photo where I was attending an afternoon ladies tea.  It’s not the best picture as the angle is a bit weird, but I wanted to show the stunning blue color and the luxurious shine. The fabric is super soft and slinky and it's lovely to wear in summer, feeling soft and cool on my skin.


04 March 2019

Toddler Harem pants


I have this lovely piece of black and white fabric with polka dots in my stash that I bought to make a cute pair of pants for my little girl. She is 3 years old and loves climbing and riding bikes and a real little wiggle worm.


The pattern is easy enough to draft yourself as the front and back panels are cut out on fold and there's only the 2 side seams and one long curvy seam in the middle.


https://za.pinterest.com/pin/572801646339810572/

To draft the pattern, I've taken an existing pair of loose fitting pants and placed it on the fabric fold but at an angle. See the above diagram that I found on Pinterest.

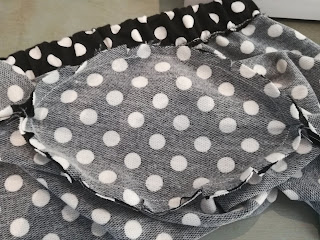
OK, so the trick to get the fit right is inserting a gusset in the crotch area , which is easy enough to draft and insert as well.

With the gusset in place, extra space is created over the crotch area. You know, for bending over and climbing up playground equipment.


The gusset is a oval shape and shown here. I've taken the picture before doing the overlock seam finish.


Final steps are the elastic waistband and the bottom leg seams which I have folded outwards.